
 Brasil
Ateliê Hacker at the Bike Lab – SESC Campinas – SP
 < / a>
A flashlight bike is always good, especially to ride the night. Despite being an essential protective equipment for the cyclist, is not all biciclata which has one, because sometimes they are not accessible. And so if you can buy a flashlight? It is possible to ride a bike iluminção for a simple, low cost, low power consumption and using recycled materials.
This circuit is ideal for this inciando and can be done by young people.
& nbsp;
Materials:
1 LED (can be reused an electronic scrap)
1 Resistor 47R (optional)
1 key-type button (optional, on and off the flashlight)
1 Battery Coin 3V (Lithium 2032) or 2 AA or 2 AAA batteries
1 Support for battery or two batteries
1 transparent plastic packaging
1 cardboard packaging
Wire or plastic seal
& nbsp;
Tools:
Soldering Iron
Hot glue gun
& nbsp;
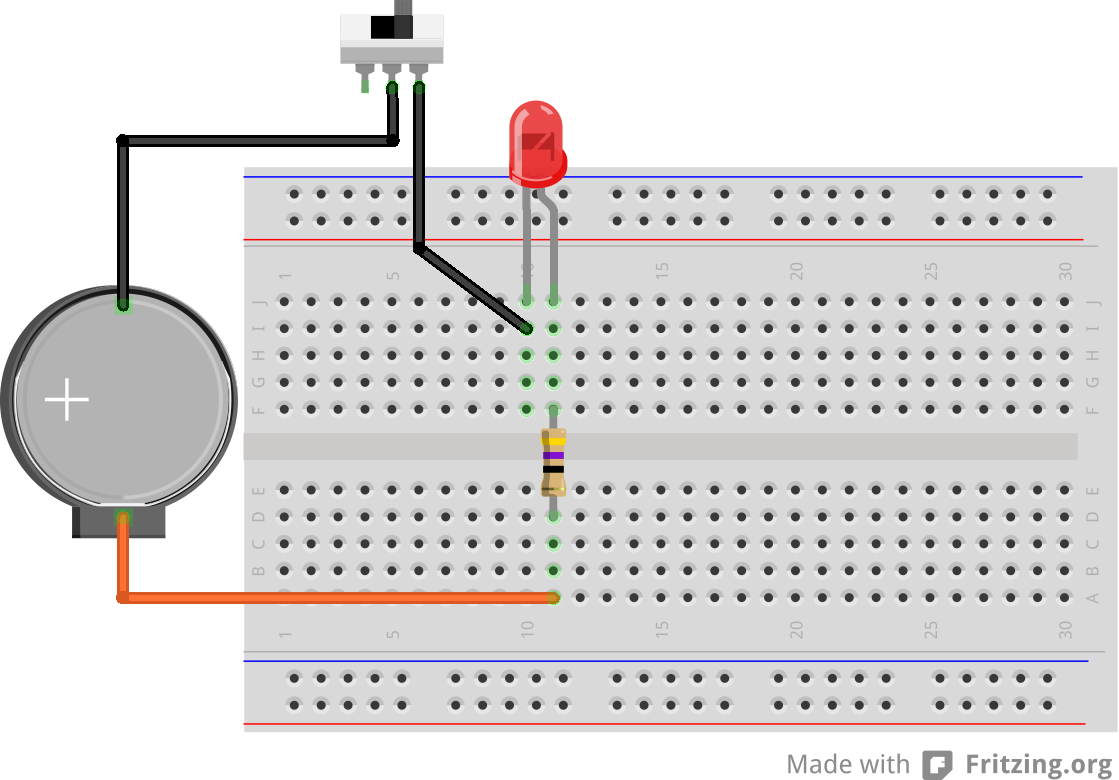
Assembly Diagram:
This diagram shows the assembly of a flashlight circuit on the breadboard.
1 Resistor 47R (optional)
1 key-type button (optional, on and off the flashlight)
1 Battery Coin 3V (Lithium 2032) or 2 AA or 2 AAA batteries
1 Support for battery or two batteries
1 transparent plastic packaging
1 cardboard packaging
Wire or plastic seal
& nbsp;
Tools:
Soldering Iron
Hot glue gun
& nbsp;
Assembly Diagram:
This diagram shows the assembly of a flashlight circuit on the breadboard.
Hot glue gun
& nbsp;
Assembly Diagram:
This diagram shows the assembly of a flashlight circuit on the breadboard.
To fix the Lantern components we solder the circuit on a piece of cardboard, which can be reused a package. Caution, do not use plastic or metallic containers as they may melt or short and that’s not cool.
Solder one end of the resistor at the positive pole of support baterial. Solder lated another resistor to the positive pole of the LED, which is the longest leg of the LED. (If the LED is reused scrap and already with cut legs, is another way to find out the polarity: the plastic led ciclindro is surrounded by a ring that has a bevel which indicates the negative pole). Solder the negative pole of the LED of the side button pins and the center pin button on the negative pole of the battery.

Transparte choose a package that has the proper size to protect the circuit from the rain, can be packaging juice, soda, cheese, yogurt, provided you have some transparency. This circuit was made to enter into a mini bottle cut Pet. After soldering it should stay that geito.

This is the reverse of the circuit with the switch type button, which was reused in a broken computer power supply. So do not be surprised marking 230V, this circuit works with 3V it.

Now it is ready, just close the package and if necessary use duct tape or hot glue to hold everyone together.

Cuidadosamenta drill two holes in the plastic side with the tip of the soldering iron will be used to secure the flashlight on the bike.

Pass a piece of wire or plastic seal the holes and secure the lantern in a visible spot on the bike.

It can use many types of packaging, that flashlight was done with a tube of soy sauce.

The ‘Great Welder’ invented a flashlight with a toothpick holder.

His version is with 2 AA batteries and no button. In this case to turn off the flashlight simply remove the batteries.

Making a flashlight with care and give away is also an act of love: from mother to child.

Gratitude to all who participated in this Ateliê Hacker workshop at SESC Campinas.


Comments by Shankara